
A design can look right on a sketch and still feel wrong when a customer puts it on. A sleeve may pull at the shoulder, or a close-fitting top may restrict a simple reach. These problems can turn a promising product into a poor wearing experience.
A repeatable development process helps us catch fit concerns before they become harder to fix. It gives our team a shared way to assess measurements, patterns, materials, samples, and production choices. The goal is not to make every garment fit every body in the same way. It is to build each product for its intended customer and design.
We can use this approach from the first fit decision through final production. Clear records also help our brand and manufacturing partners act on the same instructions. A shared fit standard gives our team and manufacturing partners a clearer basis for making each product.
Key Takeaways
- Set a clear fit intention before pattern development.
- Record body and garment measurements at named points.
- Review samples with the intended fabric and construction.
- Check movement, comfort, and balance on the body.
- Keep production teams aligned with one approved specification.
What Is Garment Fit Optimization?
Garment Fit Optimization is the process of refining a product’s measurements, pattern, materials, and construction so it performs as intended on its wearer. Fit describes how a garment relates to the wearer’s body proportions, measurements, and intended silhouette. Choosing a nominal size alone does not establish how a garment will fit.
A size label is a starting point, not a full design specification. The same label can produce different results across brands, product types, and materials. Our team must decide where the garment should sit, how it should move, and what shape it should create.
Those decisions connect through product development. Measurement choices guide the pattern, while pattern shape and material affect how the finished garment sits on the body. Sampling lets us check those choices before production begins.
Treat fit as a connected product decision, not a last-minute adjustment to a single measurement.
Ease is the difference between a body measurement and the corresponding garment measurement, providing room for movement or shaping the intended silhouette. We use that relationship alongside pattern and material decisions, rather than treating a measurement as an isolated target.
Digital avatars and virtual garment simulation can help us assess how a design relates to different body shapes and fabric behavior. Those tools can reveal areas to review, while physical samples can show how a garment behaves on a wearer. Each method answers a different development question.
Fit decisions affect the whole product, from the first draft pattern to the final sewing details. We should record those decisions so designers, pattern makers, and manufacturing partners share the same intent. The result is a process the team can repeat and refine.
We get the clearest outcome when the product’s dimensions, pattern, materials, and silhouette support one another. A well-chosen size label cannot make those pieces agree by itself. Fit works best as a planned product requirement, not a size label.
Why Does Fit Matter in Product Development?
A fit problem found on one sample is a design issue we can still correct, while the same problem in bulk production is repeated across the order. Early review gives us a chance to address proportion or construction before more units are made. Finding a defect on a sample is more manageable than repeating it throughout a production run.
Fit shapes how a customer experiences a garment. A restrictive sleeve can limit movement, while an unbalanced hem can make an otherwise strong design look awkward. Comfort and appearance both matter when someone decides whether a product suits them.
Uncomfortable clothing can disappoint a customer, even when the design looks appealing on a hanger. A poor fit may lead to a return or reduce the chance that the customer buys from the brand again. Extra sample rounds can also add work when the same problem keeps returning.
Product development gives us several chances to catch and fix those concerns. We can change a pattern or construction detail while the product is still being refined. Once bulk production starts, the same issue can affect many garments at once.
Fit should remain an explicit development requirement, rather than a detail we leave to chance. That means teams need enough time to assess comfort and appearance before production decisions are final. It also means keeping customer needs in view while evaluating design choices.
When we identify a concern, we can document its location and decide whether a pattern, material, or construction change is needed. That record helps the team compare later samples with the original issue. We protect the customer experience when comfort and appearance remain explicit development requirements.
How Should We Define Intended Fit and Ease?
A slim, tailored, or relaxed look starts with a written fit intention, then a deliberate choice about movement and silhouette ease. Wearing ease supports comfort and movement, while design ease creates the shape the design calls for. We need both purposes in the fit decision.
Minimum wearing ease is 2 1/2-3 inches at the bust, 1 inch or more at the waist of a dress, 1-1 1/2 inches at the waist of a skirt or pants, and 2-3 inches at the hips. Larger figures may need proportionally more ease for comfort and mobility.
Separate movement ease from design ease
Wearing ease leaves room for breathing and movement. Design ease adds or reduces space to create the intended look, such as a close shape or a loose silhouette. These purposes can overlap, but they are not the same decision.
A stretch or compression fabric may need a different ease choice than a structured woven. The fabric’s stretch and recovery affect how much space the wearer needs. A structured woven may need more room to support movement.
Use fit labels as a starting point, not a substitute for testing
Fit labels give the team a shared starting point for a blouse or dress. They do not replace sample review, since pattern shape and material still affect the result.
| Blouse or dress fit | Ease range | What the label signals |
|---|---|---|
| Close-fitting | 0-3 inches | Close silhouette |
| Fitted | 3-4 inches | Shaped silhouette |
| Semifitted | 4-5 inches | Some body space |
| Loose-fitting | 5-8 inches | Relaxed space |
| Very loose-fitting | More than 8 inches | Generous space |
For jackets, the listed ease ranges are 3 3/4-4 1/4 inches for fitted, 4 3/8-5 3/8 inches for semifitted, 5 7/8-10 inches for loose-fitting, and more than 10 inches for very loose-fitting garments.
We should judge the target on the actual product, not just the label. A close-fitting blouse and a structured jacket place different demands on movement and shape. Confirm that the finished design can move as intended before treating an ease target as final.
Which Measurements Should We Record?
A measurement is useful only when the team knows exactly where and how it was taken. Point of measurement (POM) means the precise landmark and method used to measure a body or garment. Record the POM with every value so teams can repeat the check.
Body measurements describe the wearer; finished garment measurements describe the product. We need both to compare the pattern’s intent with the sewn sample. A tape value without a named point or method can be hard to use later.
Record body measurements at consistent landmarks
Use the same posture and tape placement each time. Keep the tape level, close to the body, and neither slack nor pulled tight. Record all values in the same unit, such as inches, and note the method.
- Chest or bust circumference
- Waist circumference
- Hip circumference
- Shoulder width
- Sleeve length
- Body length
Compare body measurements with finished garment measurements
Relevant garment measurements can include chest, waist, hip, shoulder, sleeve length, body length, neck, rise, and inseam. We compare these finished measurements with the body data and the fit intention. This is more useful than choosing a pattern size based only on the largest body measurement, which can make later alterations harder.
Separate front and back body measurements at the bust and hip can show where ease needs to be added or removed. A single circumference may hide differences between the front and back. That detail can help us locate a pattern change rather than widening the whole garment.
Our measurement chart should name each POM, the measuring method, and the unit. A point of measurement used on a garment should also show exactly where the tape or ruler sits. Body and garment measurement guidance can help teams align their checks.
When sample measurements differ, we can compare them with the same named points used in the original record. That gives the pattern team a clear basis for reviewing the issue. Record the measurement method with the value so a later sample can be checked on the same basis.
How Do We Choose a Customer-Based Size Foundation?
A size label alone cannot establish a reliable fit standard because U.S. women’s sizing has no widely adopted standard. Our customer should guide the base size and its measurements. A factory’s “standard sizing” is not a substitute for a documented brand specification.
U.S. women’s clothing includes categories such as misses, juniors, women’s or plus, petite, tall, and half sizes. These groups address different heights and body proportions. A brand needs to choose the group that best matches its intended customer.
| Category | Intended height | Proportion focus |
|---|---|---|
| Misses | Around 5 ft 4 in | General misses proportions |
| Misses petite | Under 5 ft 4 in | Shorter proportions |
| Tall | 5 ft 8 in or above | Taller proportions |
| Women’s petite | Shorter women in larger sizes | Petite proportions |
These category descriptions give teams a useful starting point, not a universal body map. Customers within one category still have different shapes and proportions. Customer research can help a brand decide which bodies its product should serve.
A fit model helps the team test a base size against a real person. The model should reflect the intended customer as closely as practical, and the brand should record the measurements used to assess the sample. That information makes the base size more than a label.
ASTM has voluntary sizing standards, but they have not been widely adopted. Brands can therefore use different measurements for the same size number. A manufacturing partner needs the brand’s own measurements and instructions, not an assumption about what a standard size means.
Set the base size around the intended customer and record the measurements the manufacturing team must follow. The specification should state the size, body proportions, and garment measurements that define the fit. That gives the team a clear reference as development continues.
How Did U.S. Women’s Sizing Change Over Time?
A U.S. size number from the mid-20th century is not a dependable direct match for the same number on a current retail label. Size numbers drifted as systems and brand practices changed. Measurements and sizing rules matter more than a number on its own.
Early U.S. sizing research tried to link body measurements with height and body proportions. Later standards proposed structured size systems, yet they did not become one lasting rule for every retailer. Current brands still use varied size charts.
Early research linked body measurements with proportions
In the 1940s, researchers measured almost 15,000 women. They proposed combining an upper-body measurement with height and girth indicators. This approach treated body proportions as part of the sizing decision, not just one circumference.
Voluntary standards did not create universal retail sizes
The National Bureau of Standards introduced a women’s sizing system in 1958. It used sizes 8-38, with height and lower-body-girth indicators. The commercial standard became voluntary in 1970 and was withdrawn in 1983.
ASTM published a voluntary women’s sizing standard in 1995 and revised it in 2011. Retailers did not widely adopt it. The 2011 ASTM misses’ chart lists a height of 5 ft 5 1/2 in for that category.
Measurements are not the same as a dress-size label
| Period | Development | What it means for comparison |
|---|---|---|
| 1940s | Almost 15,000 women measured; upper-body, height, and girth proposal | Early research basis |
| 1958 | National Bureau of Standards system, sizes 8-38, height and lower-body-girth indicators | Structured standard |
| 1970 | Commercial standard became voluntary | Adoption could vary |
| 1983 | Standard withdrawn | No continuing mandatory basis |
| 1995 and 2011 | ASTM voluntary standard published and revised | Not widely adopted |
U.S. size numbers have drifted substantially from original standards through vanity sizing. Differences in body proportions also make direct size-number comparisons unreliable. Marilyn Monroe’s 1945 modeling-agency record lists measurements of 36-24-34 inches and a weight of 120 pounds.
Her documented measurements on May 19, 1962, were 35.5 inches at the bust, 23.5 inches at the waist, and 33.25 inches at the hips. These records describe measurements, not a dependable retail dress-size conversion. Compare documented measurements and the sizing system behind them, not the number printed on a label.
What Belongs in a Fit-Ready Tech Pack?
A factory can follow a fit intention only when the tech pack translates it into measurable specifications and construction instructions. Clear technical information helps pattern makers and manufacturing teams build the intended product. A useful tech pack connects measurements with the way the garment must be made.
A tech pack is the document that communicates a product’s technical requirements. It can include a product description, materials, measurements, sewing instructions, grading and cutting guidelines, technical drawings, swatches, color references, labels, testing, and packing details.
Specify measurements and construction together
Use a point of measurement (POM) chart to identify each measurement’s location and method. Include the base-size values and tolerances, which show how far a measurement may vary. A bill of materials (BOM) names the materials and components used in the product.
- Product description and materials
- POM chart with base-size measurements and tolerances
- Sewing and construction instructions
- Size-grading and cutting guidance
- Technical drawings, swatches, colors, labels, testing, and packing details
Drawings should identify seam placement, hardware, and embellishments. A front and back view can show the overall design, while close details clarify items such as a zipper, button, or decorative trim. Specific notes help reduce guesswork during sampling.
Make revision instructions actionable
Revision notes should name the affected measurement or construction detail and the requested change. “Make it fit better” does not tell a pattern maker what to change. A note that names a sleeve opening or a seam position gives the team a testable instruction.
Keep measurement, construction, and revision details together in the controlled tech pack. When a team makes a change, the updated record should match the sample being reviewed. That way, the next version starts from the latest agreed information.
A useful specification includes enough detail for a manufacturing partner to reproduce the intended product. It also gives the brand a record of why a change was made. Keep each approved revision in the same controlled specification used to make the next sample.
How Do Fabric and Construction Change Fit?
The same pattern can behave differently when its fabric stretches, drapes, or shrinks in a different way. Material behavior affects how a garment sits and moves. We should judge a pattern with the fabric and construction intended for production.
A stretch knit can move with the body, while a structured woven may hold a firmer shape. Stretch matters, but recovery matters too: recovery describes how well fabric returns after stretching. Poor recovery can change how a garment sits after wear.
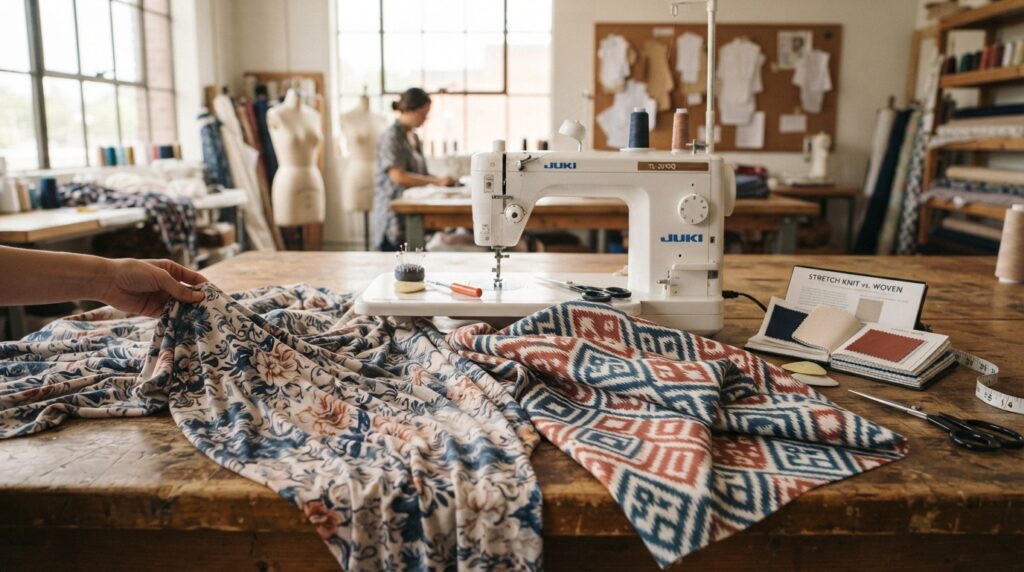
Drape affects how fabric hangs from the body. A soft, light fabric may fall close or form folds, while a stiffer cloth may stand away from the body. Those differences can make one pattern look quite different across fabrics.
Shrinkage can change length or width after finishing. A sample made from untreated fabric may not match the final garment once it is washed or otherwise finished. Weight also matters, since a heavier fabric can hang and pull differently.
Construction details affect proportion and movement as well. A seam can limit stretch, and a pocket can add bulk in one area. A waistband or closure can change how the garment sits, opens, or moves with the wearer.
Collars, cuffs, and panels can also affect balance. A stiff collar may hold a neckline differently than a soft one, while a cuff can change how a sleeve falls. These choices belong in fit review alongside the pattern.
We should not treat a measurement or approved pattern as proof of fit by itself. The material and construction create the finished product the customer will wear. Review fit using the intended production fabric and construction, not a substitute that behaves differently.
How Should We Fit the First Physical Sample?
A physical sample can show how a design sits on a person in ways a technical drawing cannot. The first sample lets us assess the garment against a real body and the design intent. It can reveal issues without being ready for production.
Choose a fit model who represents the intended customer as closely as practical. Compare the sample on that person with the measurements and drawings in the specification. The goal is to record what needs attention, not to assume the first version is final.
- Shoulder placement
- Chest fit
- Waist position
- Sleeve length
- Body length
- Overall silhouette
Check where the shoulder seam sits in relation to the wearer’s shoulder. Note whether the chest area follows the intended shape without pulling. The waist position should match the design, rather than shifting because the garment hangs unevenly.
Compare sleeve and body lengths with the sample’s stated measurements. A sleeve can look long in a drawing but fall differently when worn. The overall silhouette shows whether the product’s proportions match the design, from shoulder to hem.
A still image can help the team compare the sample with its technical drawings. It does not replace an in-person assessment, since a photo cannot show every detail of comfort. Record the observed issue next to its exact location on the sample.
The first sample should show the team where the specification and the worn garment differ. A clear note can describe a pulling seam, a misplaced shoulder, or a hem that sits unevenly. Record the observed issue beside the exact location on the sample so the pattern team can act on it.
How Do We Test Movement, Comfort, and Balance?
A sample can look balanced while standing still and become restrictive as soon as the wearer reaches or sits. Movement testing shows whether the garment works beyond a still pose. Check the product through the actions its wearer is likely to perform.
Use five basic movements to expose fit issues: sit, walk, reach, bend, and raise the arms. Watch the garment as the wearer changes position. These checks can show strain or pulling that is hidden while standing.
- Sit
- Walk
- Reach
- Bend
- Raise the arms
Look for seam strain, fabric pulling, and ride-up as the body moves. Pressure points can show where a garment presses on the wearer. Also check for excess fabric that shifts or bunches during an action.
Restricted range of motion can change how a person uses the product. A jacket that limits reaching may not serve its purpose, and tight pants may feel uncomfortable when the wearer sits. Comfort depends on what the garment lets the wearer do.
Compare balance and proportions while the wearer stands still and while moving. A hem may look level at rest but rise during a reach. A sleeve can shift or pull when the arm moves.
Activewear, workwear, outerwear, and fitted products especially benefit from movement checks. Their intended use often involves actions that a still fitting-room pose cannot show. Approve comfort only after the wearer can perform the product’s intended movements without a new restriction.
How Can We Refine a Pattern Without Guesswork?
Start with the shoulder and upper chest when a problem there is distorting the rest of the garment. Structural areas first keeps a local issue from being masked by a change elsewhere. Connect each pattern adjustment to a recorded measurement or fitting observation.
Shoulder and upper-chest fit can affect how the garment hangs below. If those areas are wrong, adjusting the waist or hip first may not solve the source of the imbalance. Work from the upper body downward, then review the lower areas.
Make structural changes from the upper body downward
Use the sample notes to identify the location and type of problem. A shoulder seam that sits too far forward calls for a different change than a tight chest. The pattern adjustment should match the observed issue.
A 2025 study of Korean men within a narrow size range tested body-type patterns and structured fit changes. Its expert reviews found improvements across 11 fit criteria, and muslin prototypes supported the virtual-fit results. The body-type pattern study focused on that group, so its results do not set universal fit rules.
Test darts and seams in a muslin
Darts can refine shape by changing their width, length, or angle. A side seam can be taken in or let out to adjust the garment’s shape. Make one clear change at a time when possible, so the team can tell what affected the result.
A muslin or test garment lets us check a pattern change before cutting expensive production fabric. It can reveal whether the new shape solves the issue or creates another one. Use the same fit notes and measurements to judge the test.
Record each change against the sample location and the measurement it affects. That record can show why the team changed the pattern and what result it expected. Refit the adjusted test garment before transferring the change to the production pattern.
How Do We Check Size Grading Across the Range?
A pattern that fits its base size can still produce an unbalanced garment in a smaller or larger size. Size grading should preserve the intended proportions, not simply enlarge every measurement by the same amount. Review sizes beyond the base before approving the full range.
Compare a smaller and a larger size with the approved base. Check chest, sleeve length, body length, shoulder, waist, and hip balance. Each area may need a different change to keep the product’s shape recognizable.
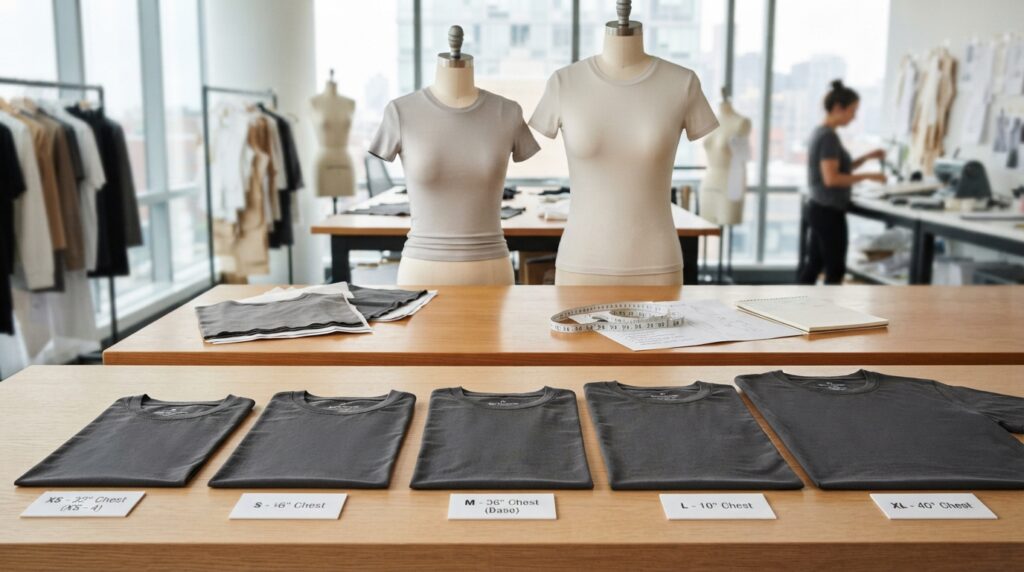
Compare smaller and larger sizes with the base
Review how each size relates to the base pattern. A chest change should not force a sleeve or shoulder change that makes the garment look out of balance. Sample review in sizes outside the base can help us spot issues on the body.
Where practical, use a fit model or sample review suited to the size being checked. A smaller or larger garment may sit differently than the base, even when its measurements follow the grade rules. Direct review can reveal how those changes affect the fit.
Check proportional changes, not just measurement increases
Adding the same amount to every measurement can distort silhouette and movement. A sleeve length does not always need the same increment as chest width. Each grade should reflect the body proportions and design intent for that size.
Check that the shoulder, waist, and hip changes work together. If the waist grows too much in relation to the chest, the garment can lose its intended shape. If body length changes too little, the proportions may feel compressed.
Use a record of each size’s measurements to compare the graded samples. The team can see whether the changes match its rules and whether the garments still serve their intended purpose. Approve grading only after the intended proportions remain recognizable across the sizes the brand plans to sell.
When Should We Use Digital Fit Tools?
Digital fit tools are most useful when we match the tool to the fit question rather than treating a virtual image as final proof. Choose the method based on the insight we need, such as fit across body shapes or shopping guidance. Virtual results still need checks against the intended product and wearer.
Physical samples, 3D garment simulation, digital body avatars, and virtual try-on each use different inputs. They also answer different questions. The table compares their uses and limits.
Match the tool to the fit question
| Method | Inputs | Useful fit insight | Limit to check |
|---|---|---|---|
| Physical sample | Garment and wearer | Real worn behavior | Sample cost and time |
| 3D simulation | Pattern and fabric properties | Fit and fabric behavior visualization | Virtual results need validation |
| Digital avatar or soft-body model | Body-shape data and pattern | Fit across body shapes | Avatar must represent intended customer |
| Virtual try-on | Customer image or scan and product data | Shopping visualization or size guidance | Drape, movement, usability, and privacy |
Digital avatars and virtual garment simulation can help us view a product across body shapes and fabric behavior. VitalFit can test existing patterns within Browzwear VStitcher and supports compatible Alvanon Virtual AlvaForms. These are examples of tool compatibility, not endorsements.
Keep physical validation for real-world behavior
Virtual try-on may help customers picture a product or choose a size, but its results have limits. A photo-based tool may not show how fabric drapes or moves. Image and scan features can also raise customer privacy concerns.
When we assess a tool, we should consider accuracy, ease of use, customer adoption, scalability, and data privacy. A tool that works well for one product or team may not suit another workflow. We should also consider whether its inputs match the materials and body shapes we need to assess.
Physical samples can confirm behaviors that a virtual view may miss. Digital tools can still help us compare options before making a sample or reviewing a full size range. Validate any digital fit decision against the approved fabric, pattern, and intended wearer before relying on it for production.
What Must We Approve Before Bulk Production?
Bulk production should begin only after the final sample and its specifications agree. One approved reference gives the brand and manufacturer the same fit target. A material or construction change after approval should trigger a fit review.
The approved production reference can include final measurements, size grading, fabric, construction, branding, finishing, fit notes, and quality requirements. It should be clear which sample and tech pack represent the current decision. Manufacturing should not rely on an outdated draft.
- Final measurements and tolerances
- Approved size grading
- Production fabric and construction
- Branding and finishing
- Approved sample, fit notes, and quality requirements
Final measurements and tolerances tell the production team what values to meet. The grading record shows how those measurements change across sizes. Fabric and construction details must match the sample that the team approved.
Branding and finishing can affect the finished product, so those details need clear approval too. The reference should name the labels, trims, and finish the manufacturer must use. Quality requirements should tell the team what to check during production.
If fabric, seams, or other construction details change after approval, the garment may fit differently. We should review the change before treating the approved sample as proof for the new version. Keep the current tech pack and sample as the manufacturing reference.
A dated approval helps teams identify which specification is current. It also reduces the risk that the brand and factory use different versions. Keep one dated, approved reference available to both the brand team and manufacturer.
How Can We Measure Fit Optimization Results?
We can calculate process efficiency as useful output divided by input, but fit optimization also needs measures of fit quality. Consistent tracking helps us see whether the process improves over time. Efficiency is useful only when we define output and input in the same process context.
A garment line might measure completed units against labor time. That production measure does not show whether a sample fit well or whether customers liked the result. Fit development needs its own measures.
We can track sample rounds, first-pass sample approval, point-of-measurement deviations, and time from first sample to approval. These measures show how development changes from one product cycle to another. Use the same definitions each time.
For example, a team could count a sample round whenever it reviews and records a new sample version. First-pass approval can track whether the first submitted sample meets the agreed approval criteria. A POM deviation records the difference between the sample and its required value.
Customer returns, fit complaints, and product reviews provide later feedback. Those signals can help us see whether a fit issue appeared after the product reached customers. They should be read with care, since feedback can reflect more than fit alone.
Compare the same product category and development process over time instead of claiming a universal performance target.
We can review results for similar products across different cycles. A change in sample rounds may matter more when we compare products with similar complexity and review rules. Consistent tracking makes patterns easier to spot.
Use results to update the next development brief, rather than treating one measure as a complete verdict. A faster process is not useful if the garment’s fit or quality declines. Review a small set of consistent measures after each product cycle and use the pattern of results to update the next development brief.
Conclusion
Better apparel results come from treating fit as a development requirement we can document and verify. Measurements, fabric, patterns, samples, grading, and production instructions work best when they remain connected. A record of the fit decision gives the team a standard to check against.
Choose an upcoming product and document its intended fit, base-size measurements, fabric, and sample-review plan before pattern development begins. That gives the team a clear starting point and a way to assess its decisions. Start the next product brief with a defined fit intention and the measurements needed to test it.